Chapter 4 Waters SYNAPT G2-S
4.1 Warm-up knowledge
4.1.1 What is an Inlet Method?
Mass spectrometers are often used in conjunction with an inlet system such as a liquid chromatography (LC) or a gas chromatography (GC). MassLynx can control this equipment during data acquisition to provide complete control of an experiment. Autosamplers will often be used to automate the running of samples.
An inlet method is a group of settings for the inlet system. An inlet method can be created and then specified for use during an experiment, and those settings will be applied during the data acquisition. A number of different inlet methods can be created, saved, and used for different types of experiment.
4.1.2 What is an MS method?
Mass spectrometers can acquire a number of different types of data from the samples supplied. While these will vary depending of the capabilities of the instrument they may include, for example:
a scan over a specified range of masses
a scan of a single targeted mass
the results of scanning the fragments of particular target ions
Different data types can be acquired from a sample in a single experiment. MS method is a group of settings defining the scans that the mass spectrometer should perform. Once an MS method has been saved, these settings can used when acquiring data from samples.
4.1.3 What is tune method?
To obtain the most useful results from your mass spectrometry system, the controls of the instrument need to be adjusted to achieve the best resolution (narrowest peak) and highest sensitivity (tallest peak) possible.
You can make these adjustments through MassLynx and, on some instruments, MassLynx can even tune the instrument automatically.
If the instrument is not tuned properly, the results you obtain will be less useful, and possibly even misleading.
4.1.4 What is a Sample List?
A MassLynx Sample List is a list of the samples available for analysis by the mass spectrometer. Among other things, it can include:
Information on the name to be given to the data acquired
Inlet methods to use
MS methods to use
Tune settings to apply
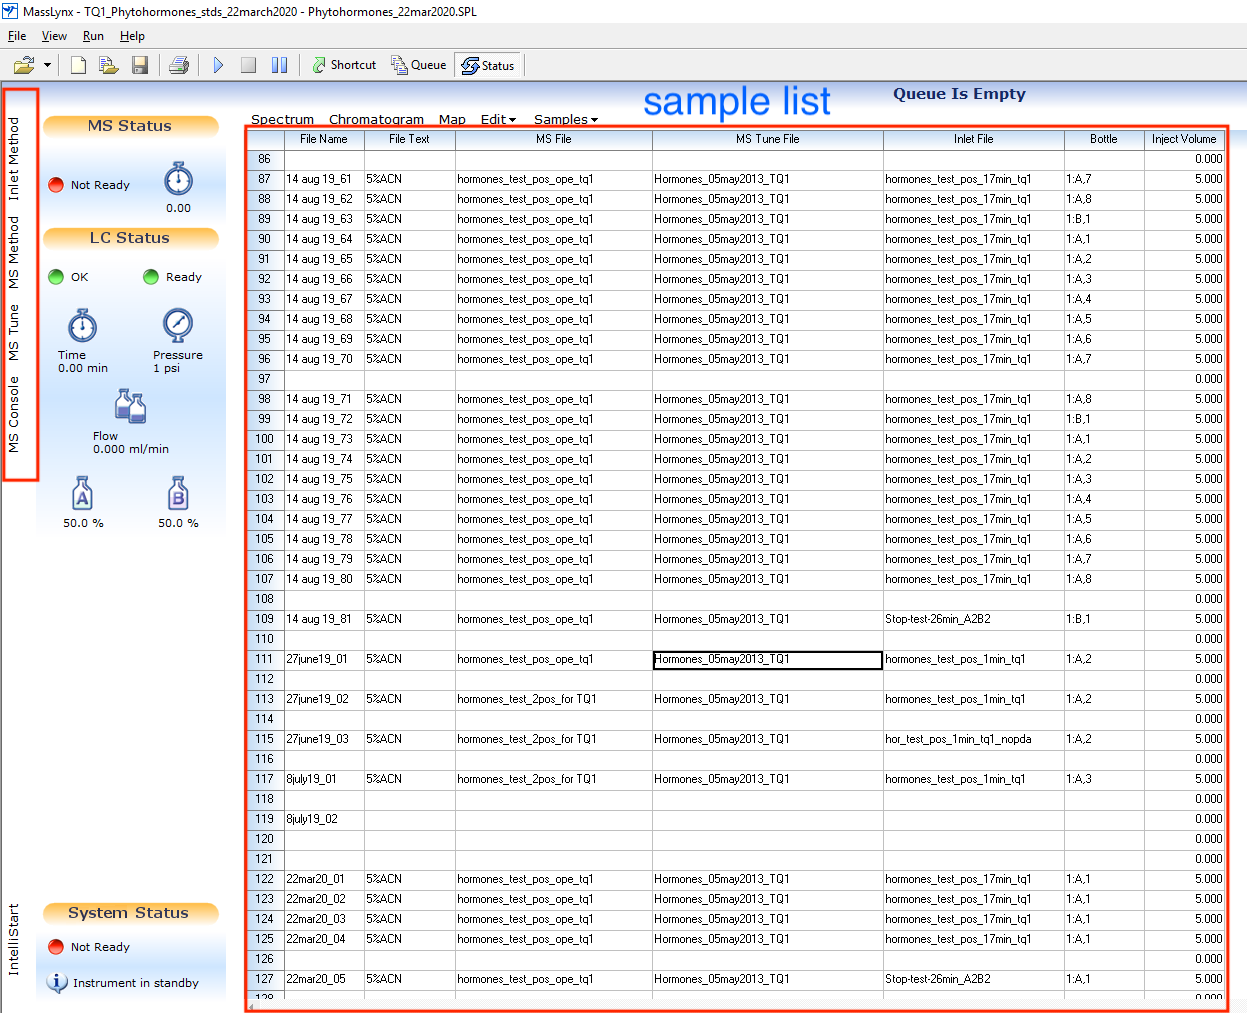
Figure 4.1: Overview of MassLynx interface
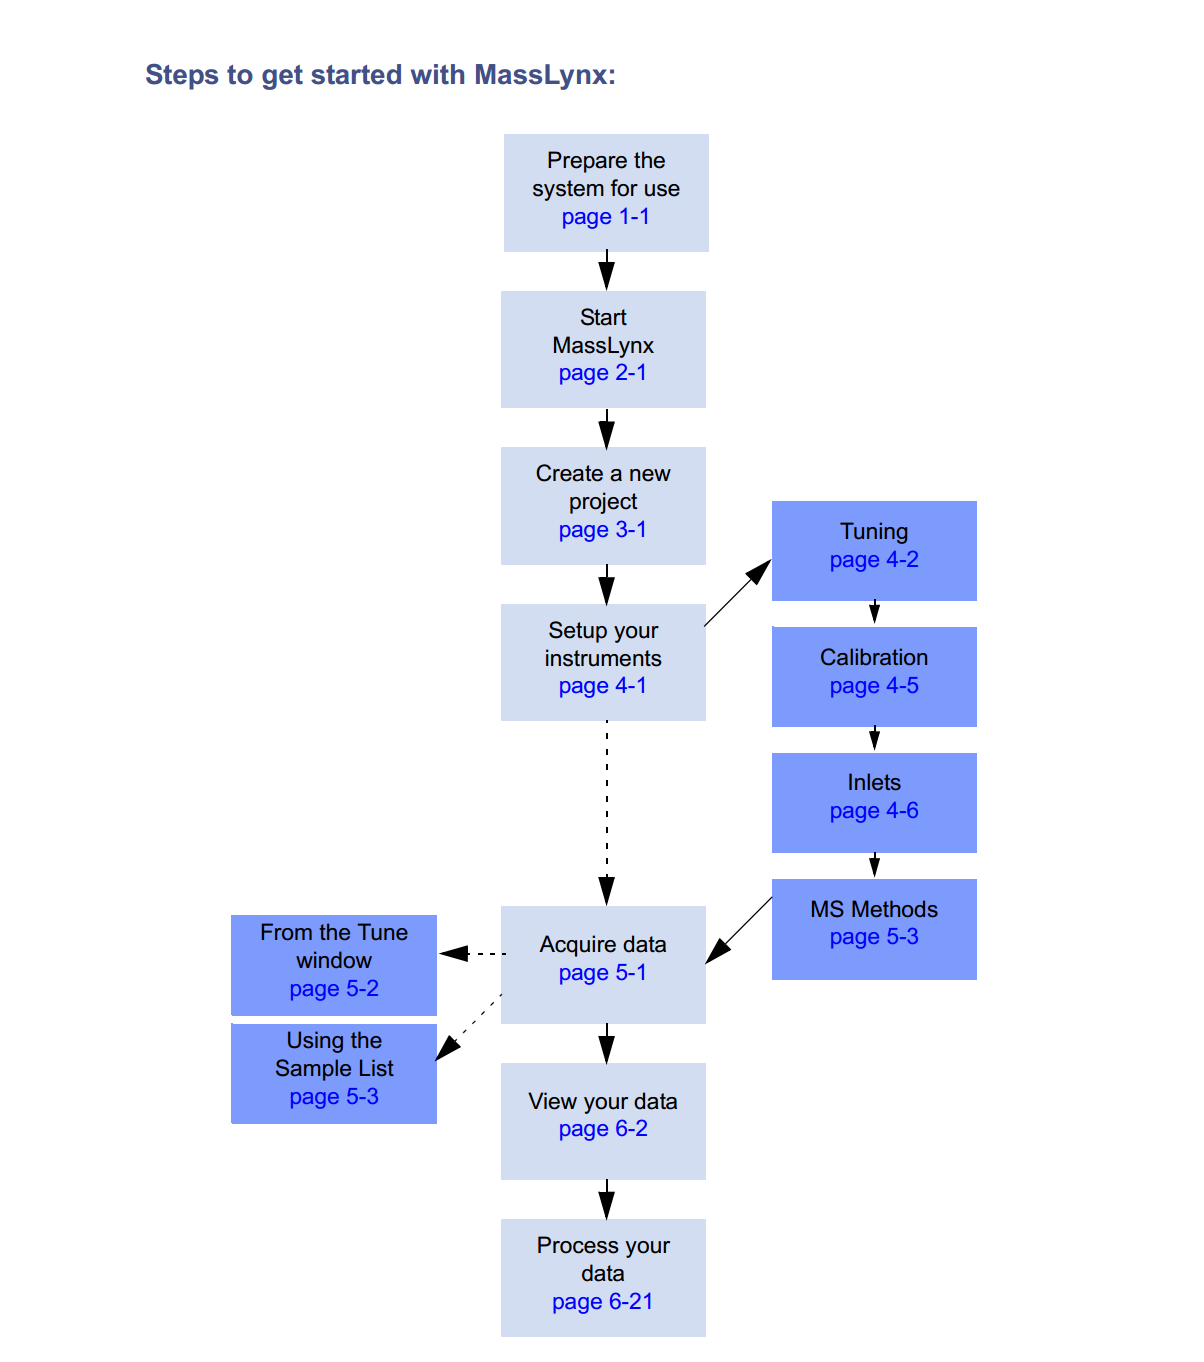
Figure 4.2: Steps to run a project
4.2 Running a LC-MS project
- Check Lock spray peak intensity, resolution, and peak shape. Make sure that the instrument is in the proper working condition. Below are the typical reference information for lock mass peak at positive and negative ion mode.

Figure 4.3: lock mass at positive ion mode
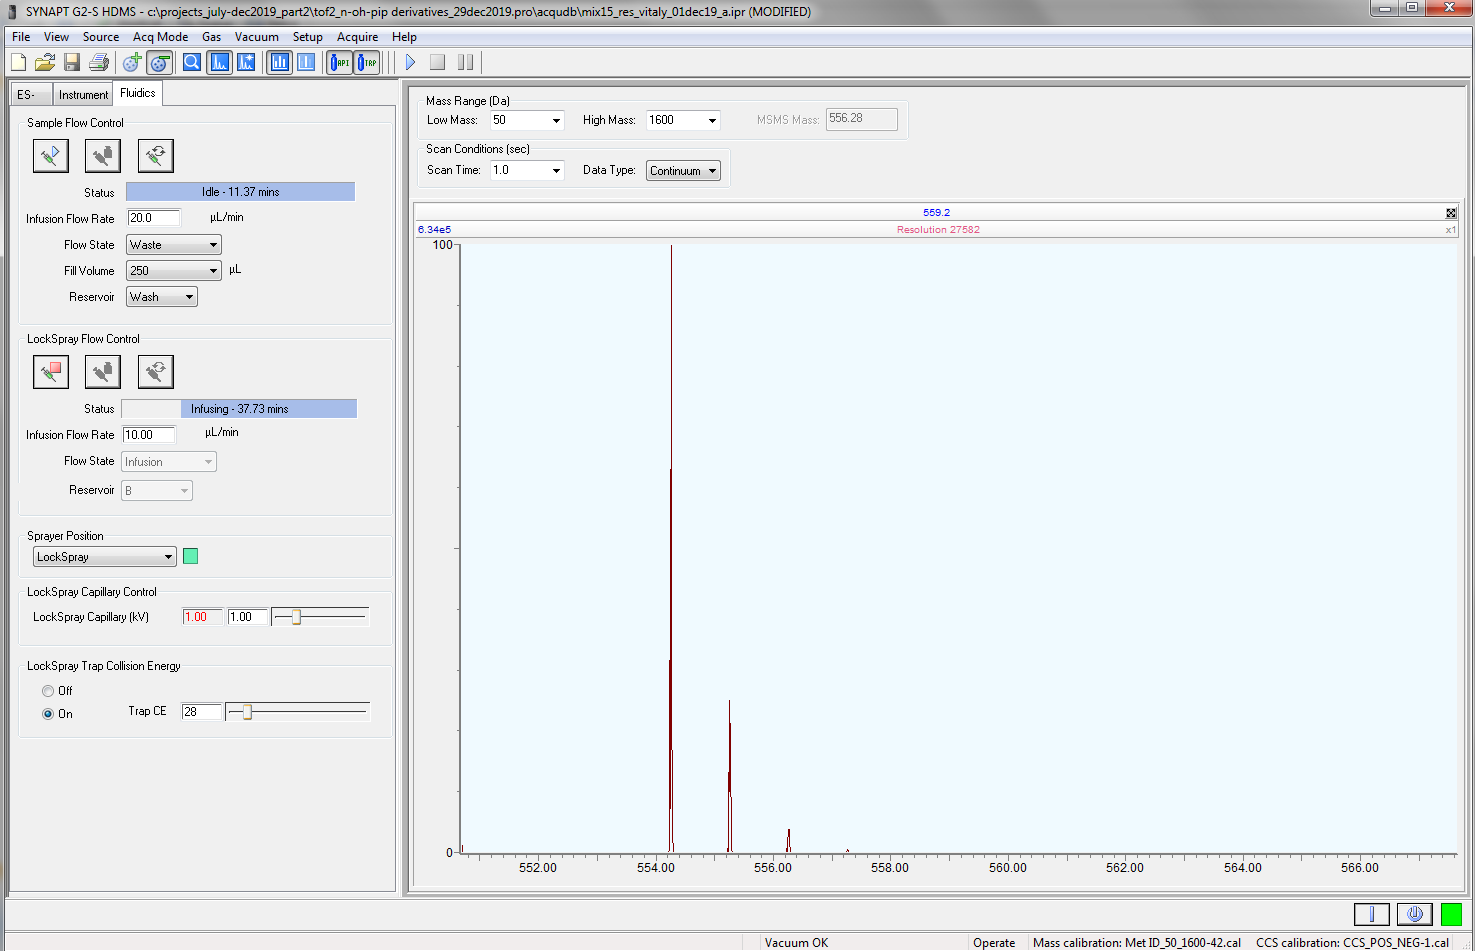
Figure 4.4: lock mass at negative ion mode
- Make sure in Sample Flow Control tab, Flow state is in Waste, Reservoir is in Wash. see Figure 4.3 and 4.4 for details.
- Go to Console/Binary Solvent Manager, click control, perform Prime A/B solvent and Prime seal wash. A/B solvent prime time is 3 min, and seal wash prime will stop when A/B prime stops.
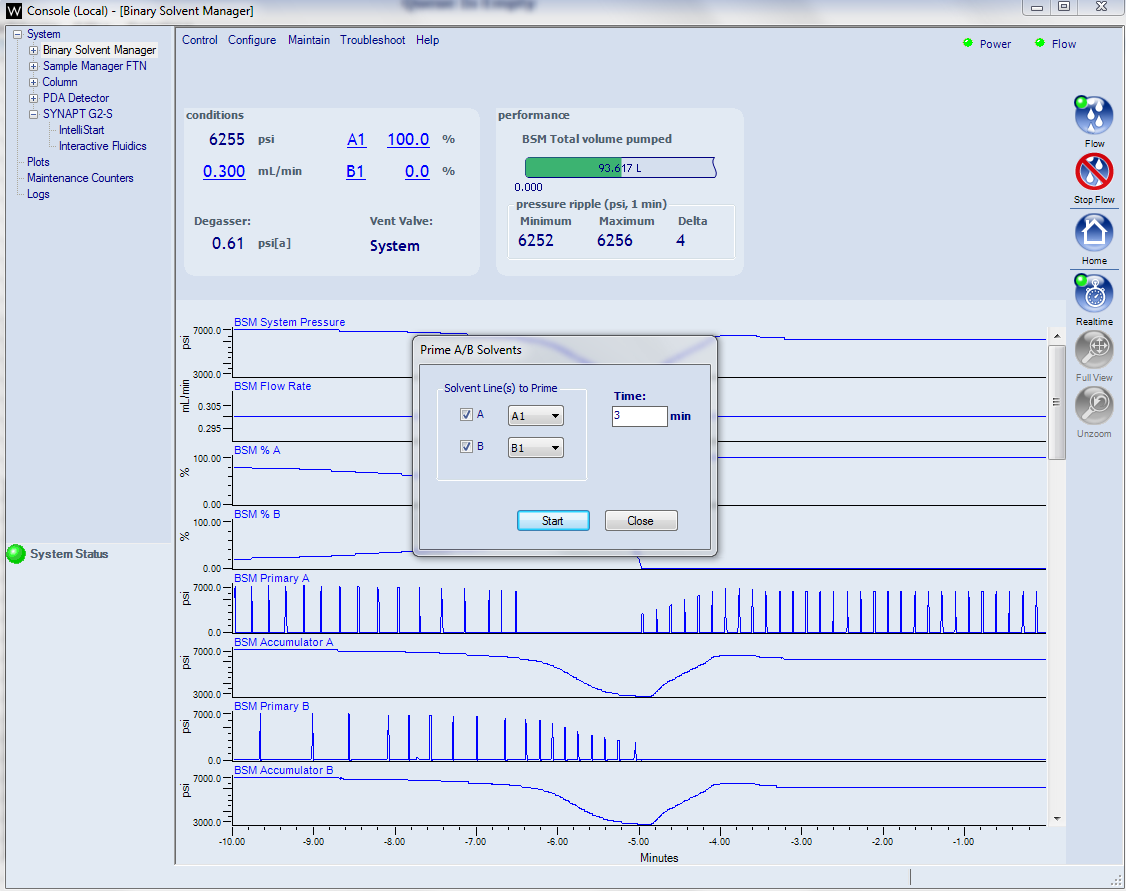
Figure 4.5: Binary Solvent Manager prime
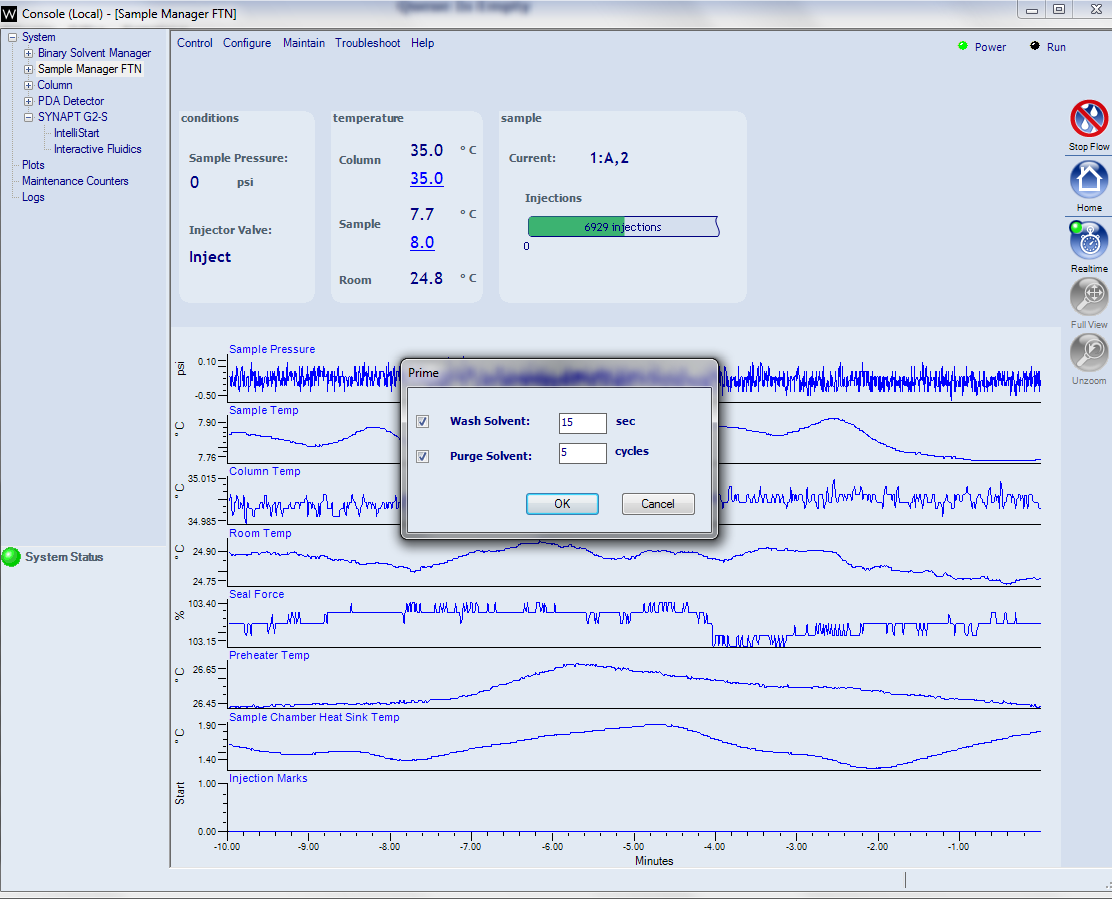
Figure 4.6: Sample Manager FTN Prime
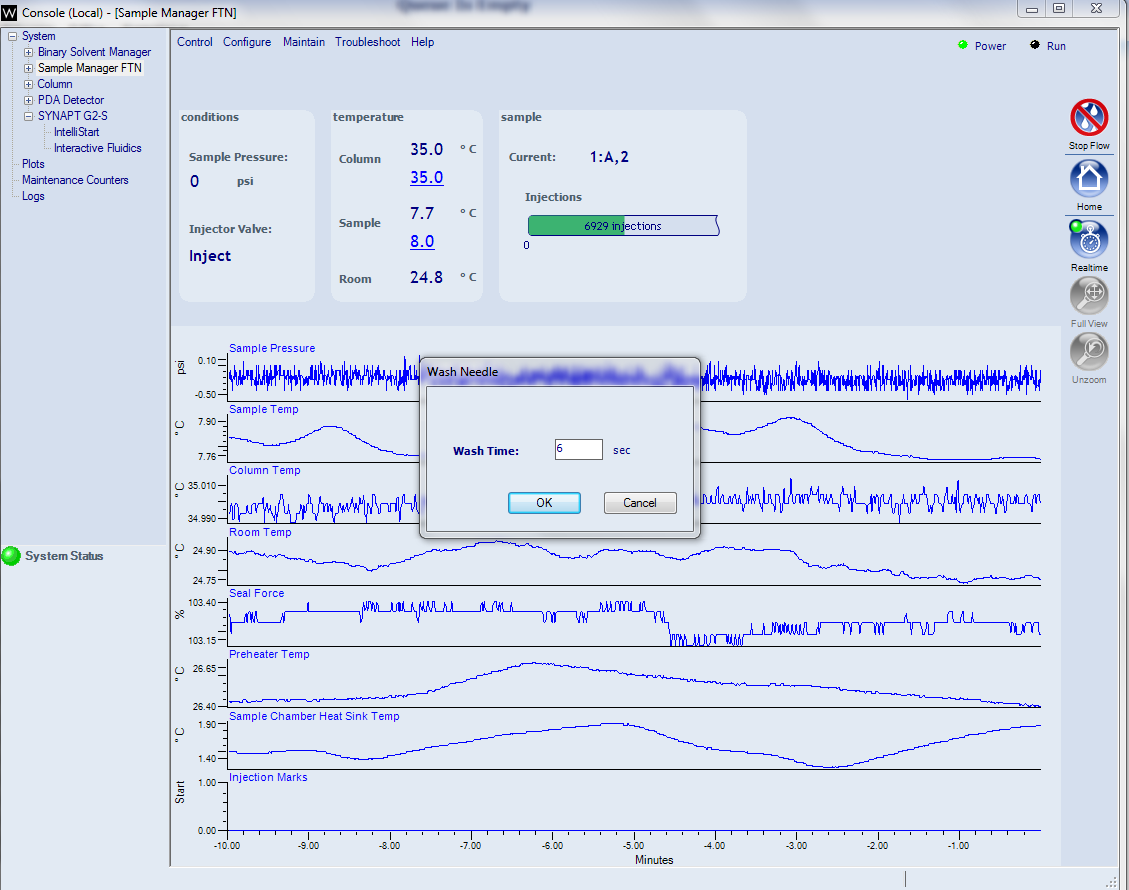
Figure 4.7: Needle wash
Turn on PDA detector
Go to Console/SYNAPT G2-S, check If you are using the right Tune Method, and Mass Calibration Method.
Set binary solvent ratio and column temperature. You can either set them in console, or load the method to automatically set them. In order to automatically to do so, you need to go to sequence table, select and edit Inlet Method. In this tab, Click LC, select load method, then the binary solvent ratio and column temperature parameters will be loaded in console file.
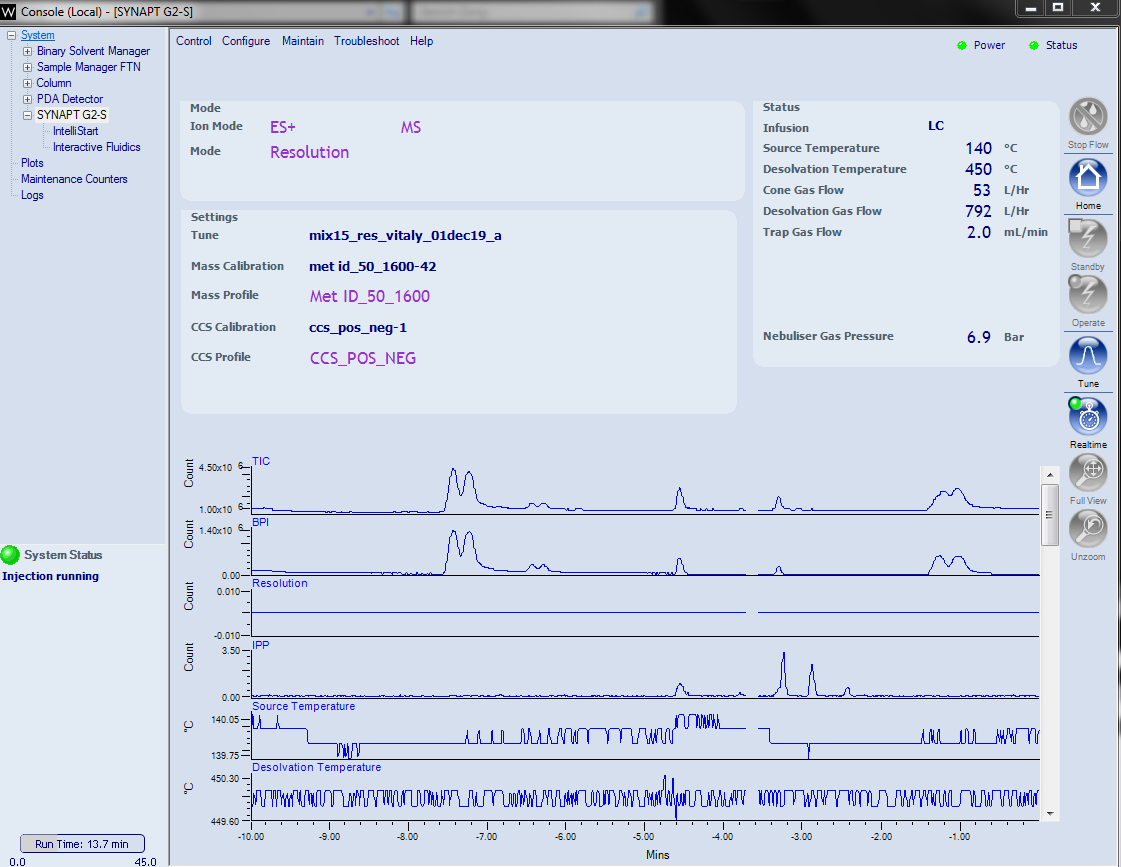
Figure 4.8: Check the attached methods
Figure 4.9: Load the method for binary solvent ratio and column temperature
Select the sequences to run. Ilana prefers to run batches, i.e. positive, negative files, so as to better manage the problems happened during the run.
Do not forget to enable Shutdown.
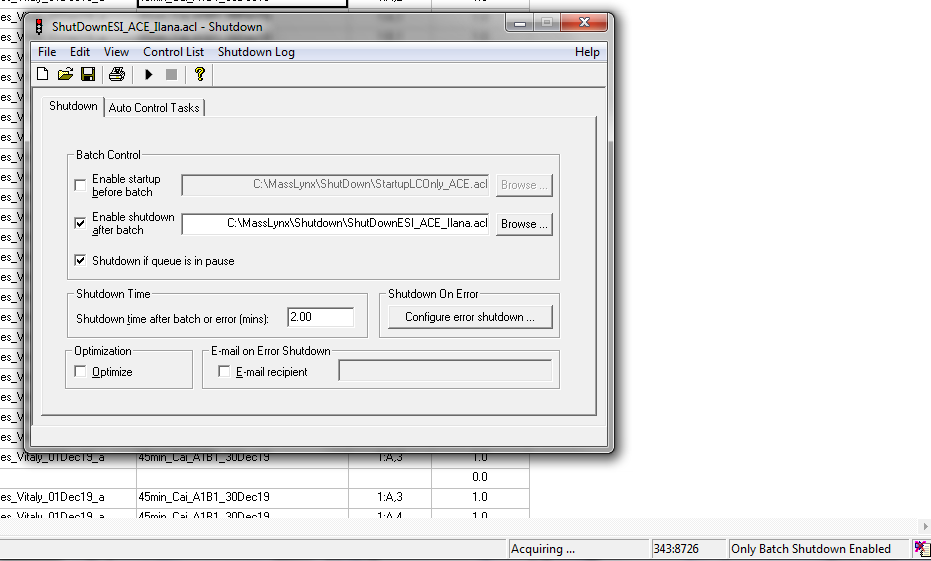
Figure 4.10: Enable shutdown
4.3 Pratical user manual
4.3.1 Calibration
4.3.1.1 Detector Check
Detector check is much faster than detector set, that’s why we first perform detector check. If it does not pass, we will then perform detector set.
4.3.1.1.1 Tune Page Setup
Start tune page (Make sure that you select the right tune method).
Select analysis mode. There are three modes: Sensitivity, Resolution and High resolution, we used Resolution
Check lock mass signal (LeuEnk, 400 ng/ml, 10 ul/min) in positive and negative ion mode. Make sure we can well detect lock mass signal.

Figure 4.11: Tune page setting
4.3.1.2 Detector Check
- Go to Console page, select Intelli Start, click configure / Nomarl Mode
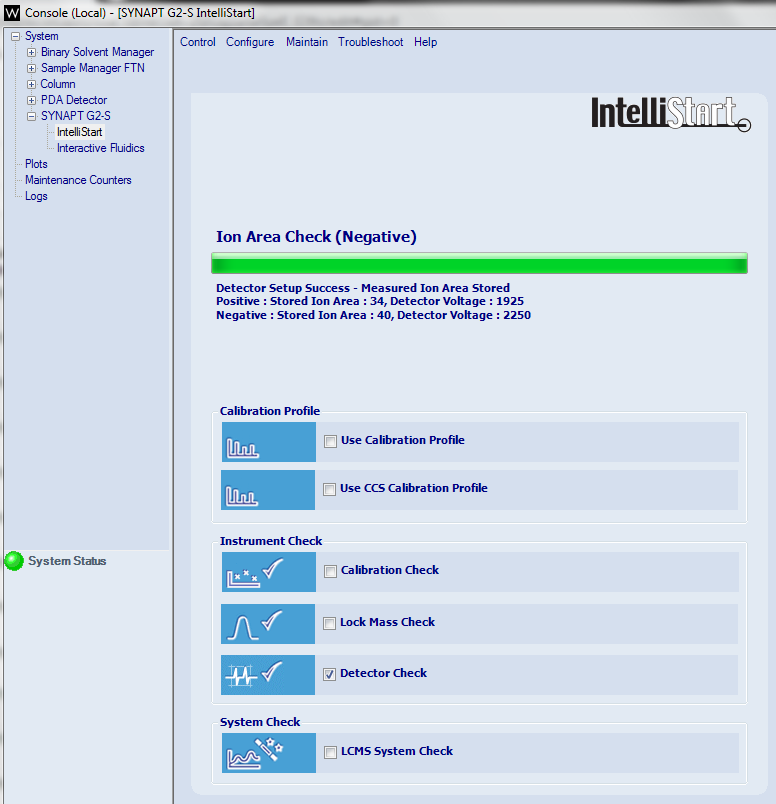
Figure 4.12: Detector check page
Select Detector Check, you can select from Automatic, Custom, and Tune, for detector check.(Ilana prefers Automatic or Tune), and the click Start on the right side.
Instrument will perform detector check for both positive and negative ion mode, and the results will be generated as reports once detector check is finished. Basically, it compares the peak area of LeuEnk with the previous one, and if the peak area difference is less than the defined threshold, the detector check will pass; otherwise, it will fail. See Figure 4.13.
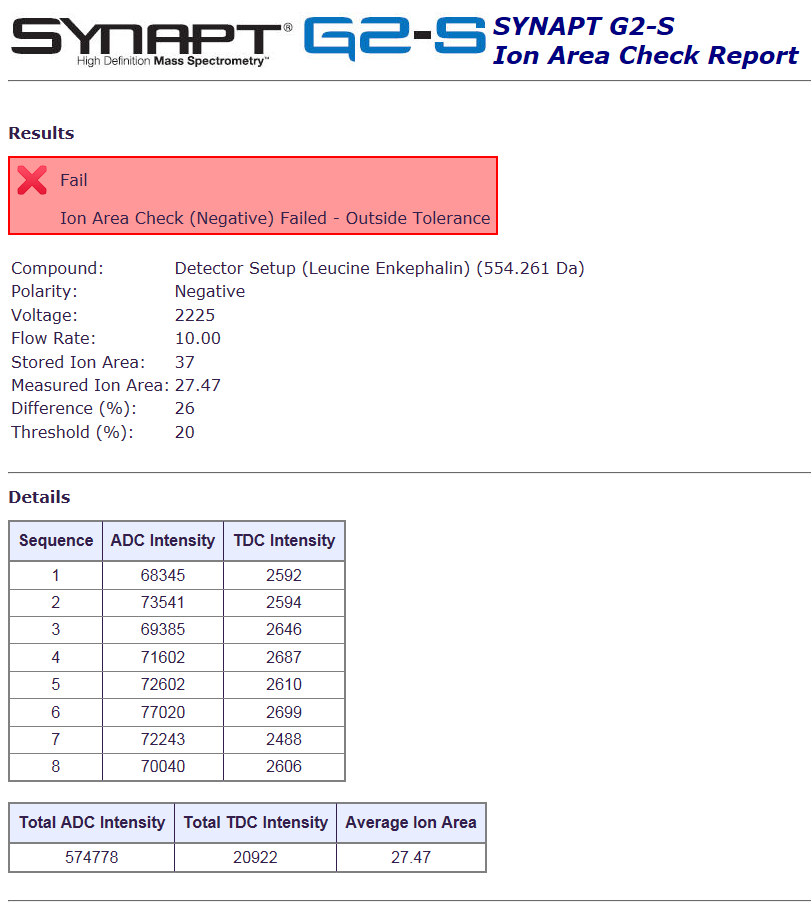
Figure 4.13: An example of detector check report
This step is usally fast, that is why we first perfom detector check.
If detector check failed, then we need to setup detector, see example in the figure above.4.3.1.3 Detector Setup
When detector check failed, we then need to do Detector Setup. The process is quite similar as Detector Check except that it takes longer time.
- Go to Console page, select Intelli Start, click configure / Configuration Mode
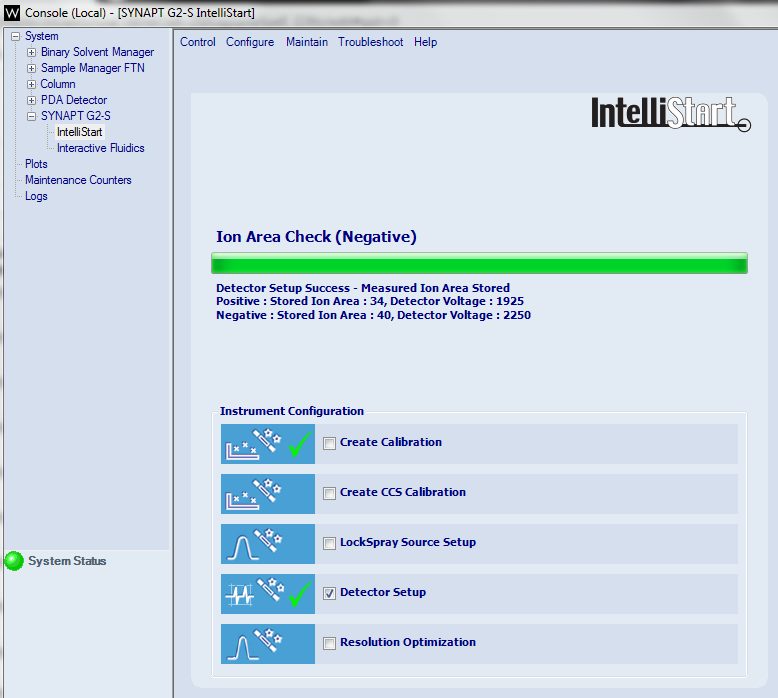
Figure 4.14: Detector setup page
Select Detector Setup, you can select from Automatic, Custom, and Tune, for detector check.(Ilana prefers Automatic or Tune)
Instrument will perform detector Setup for both positive and negative ion mode, and the results will be generated as reports once detector check is finished.
4.3.1.4 Calibration
After Detector Setup, we need to calibrate the Mass Profile. Calibration solution is TOF Instruments Service Sample Kit (NaFA), the bottle should be placed in position C (CALIBRATION), as shown in the figure below.
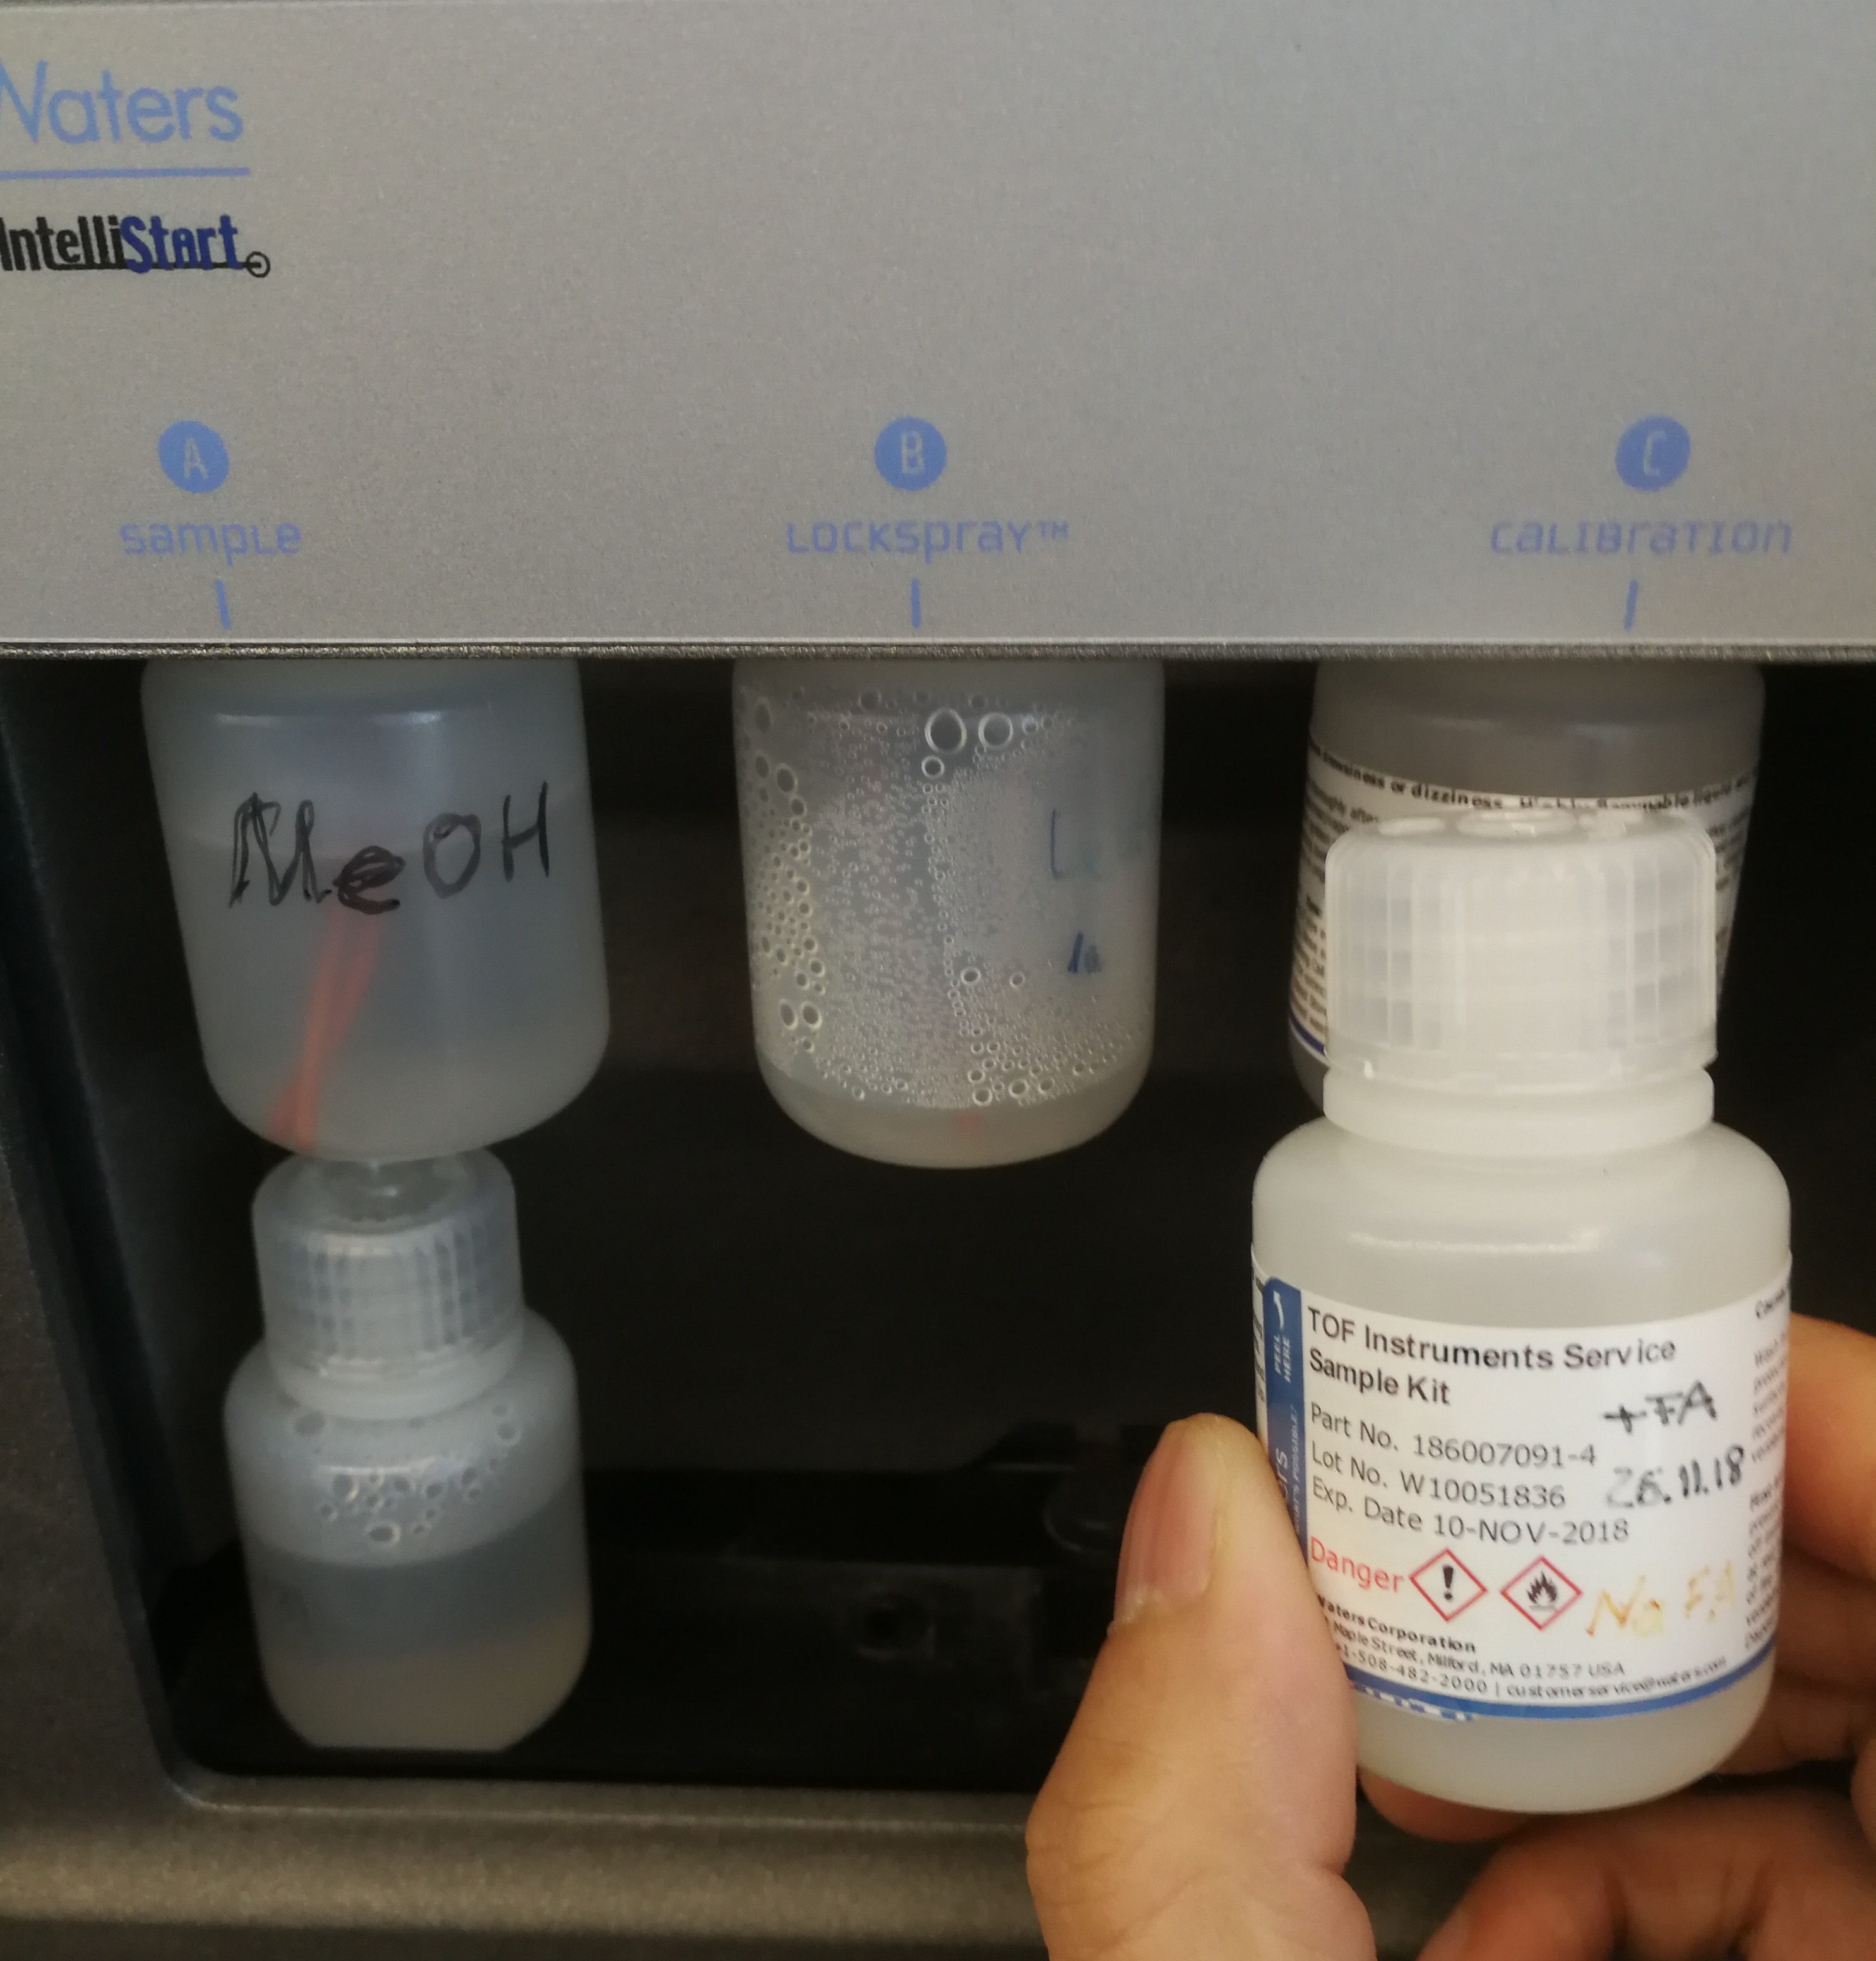
Figure 4.15: Calibration solution and it should be placed in position C
- Before Calibration, you need to make sure that the calibration solution signals are good. To do this, you need to first go to tune page. Set Spray Position to Sample, and in Sample Flow Control, set Reservoir to C, Flow state to Infusion.
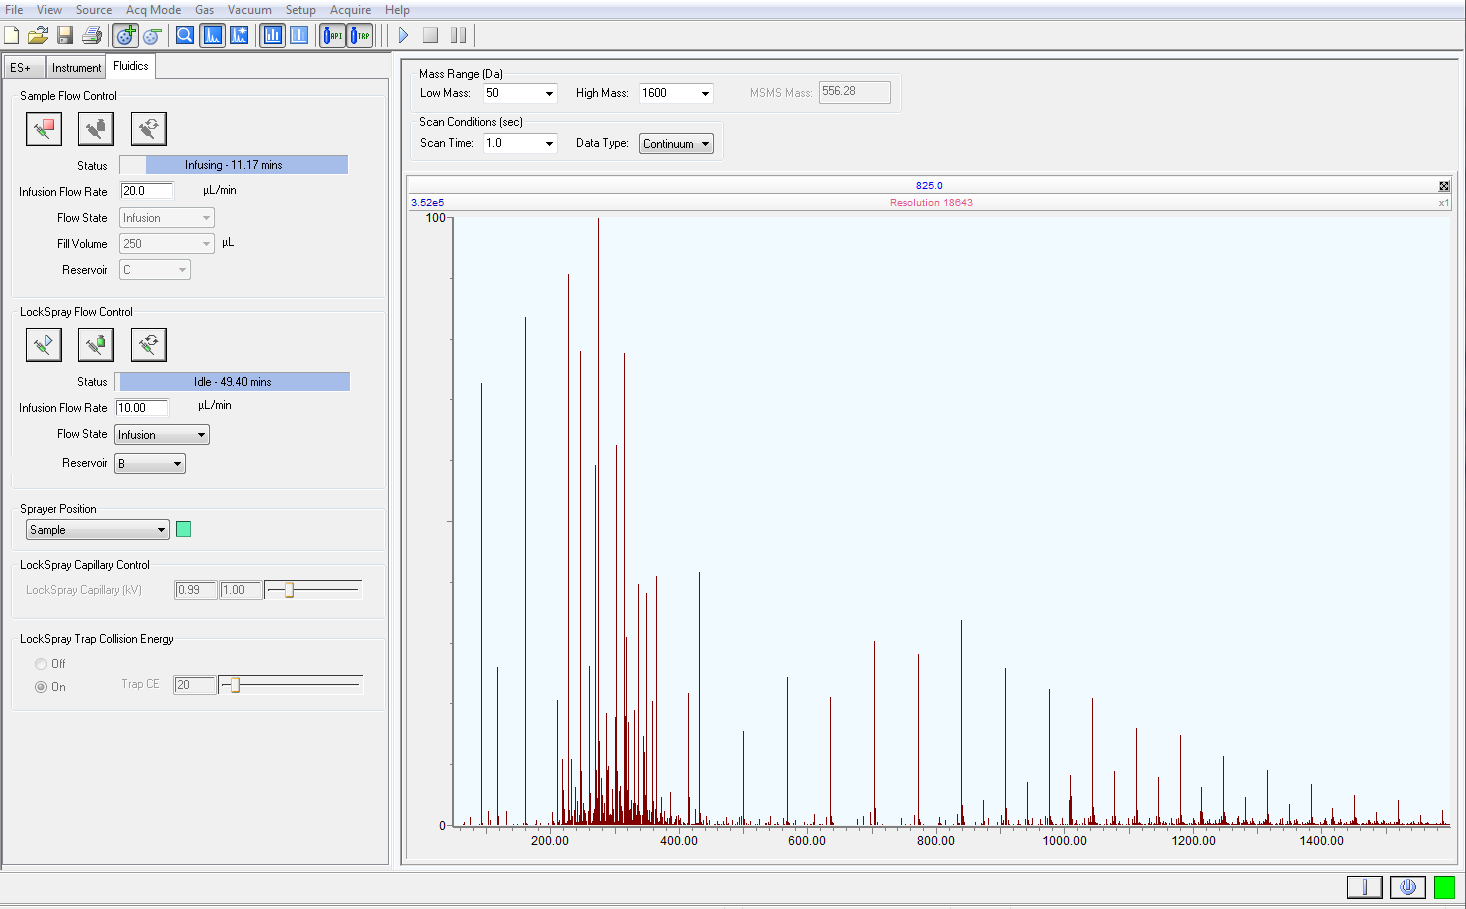
Figure 4.16: Tune page setting
- If the ion signal at higher mass range is too low. You need to increase Sampling Cone in ESI tab (see figure below). It is usually only necessary at positive ion mode (Ilana usually increases it to 80).
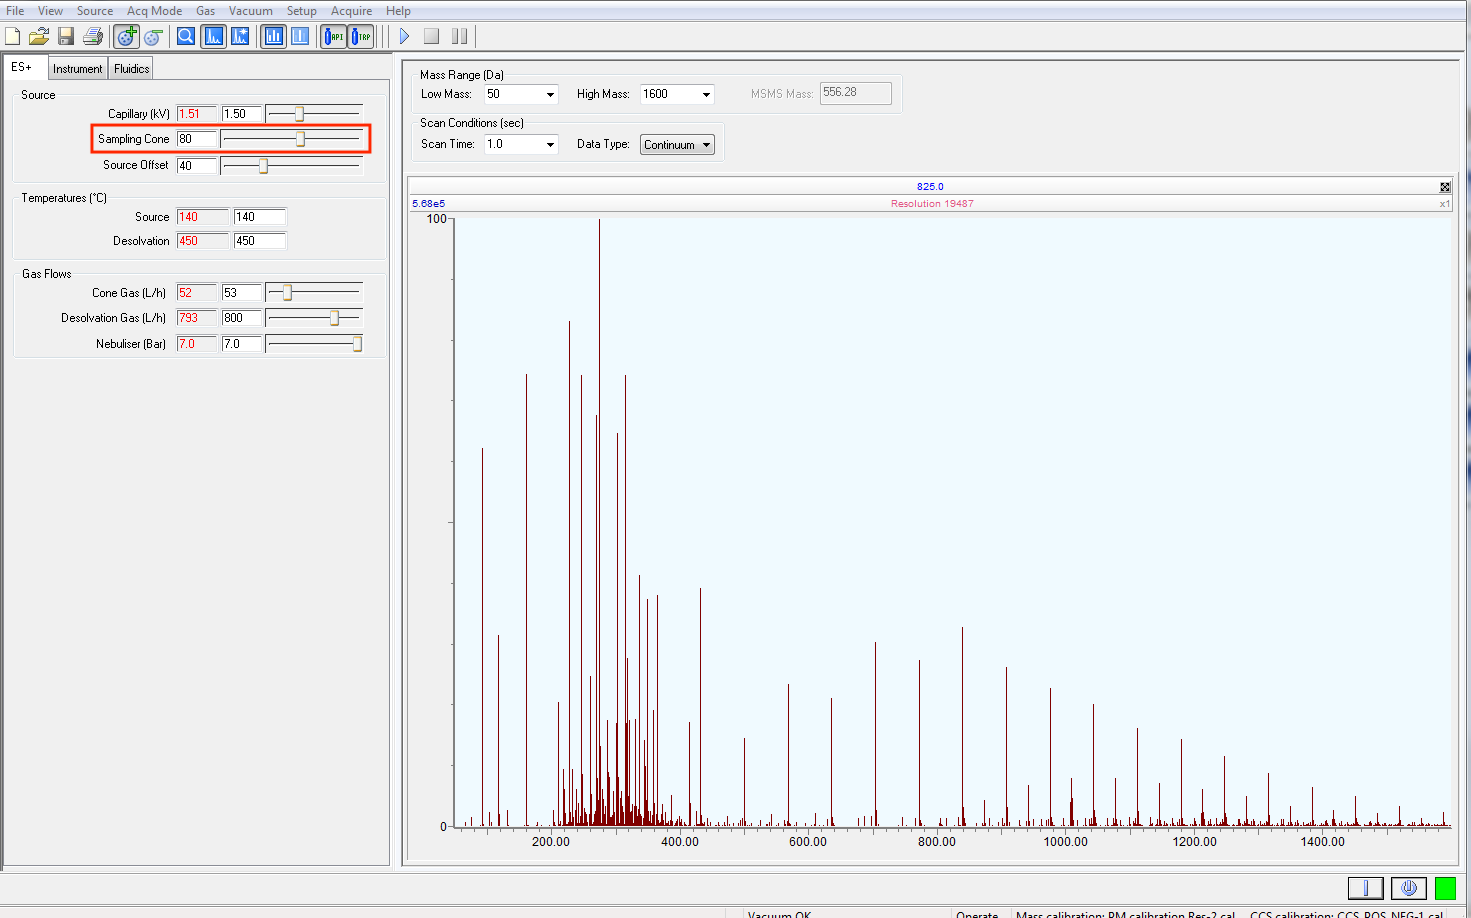
Figure 4.17: Modify sampling cone to increase the ion signal in higher mass range
- Go to Inteli Start/normal mode, select Use Calibration Profile, then click Start, and select another already calibrated file, click OK.
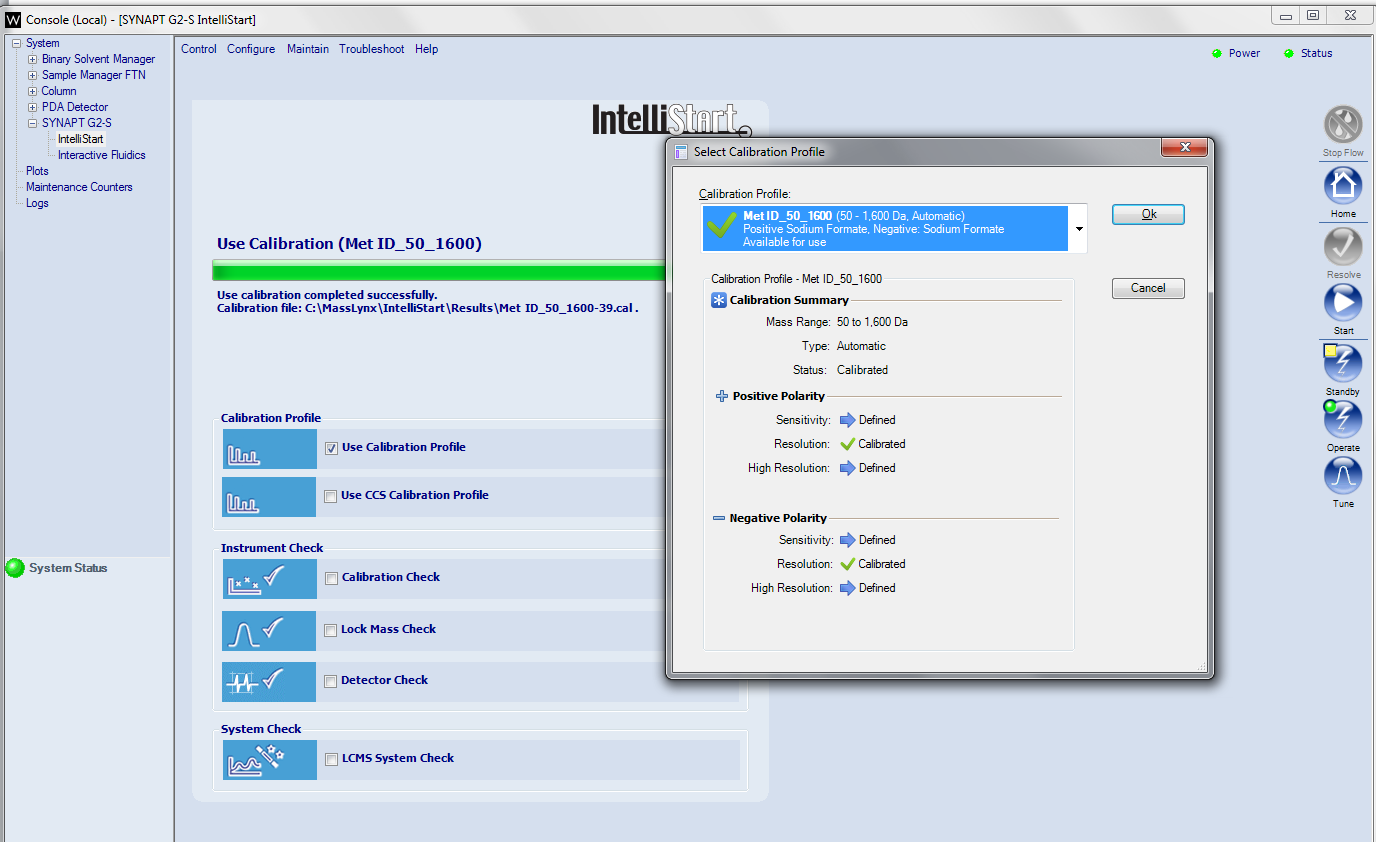
Figure 4.18: Select calibration profile
- Go to SYNAPT G2-S, and make sure that you selected calibration file is already attached.
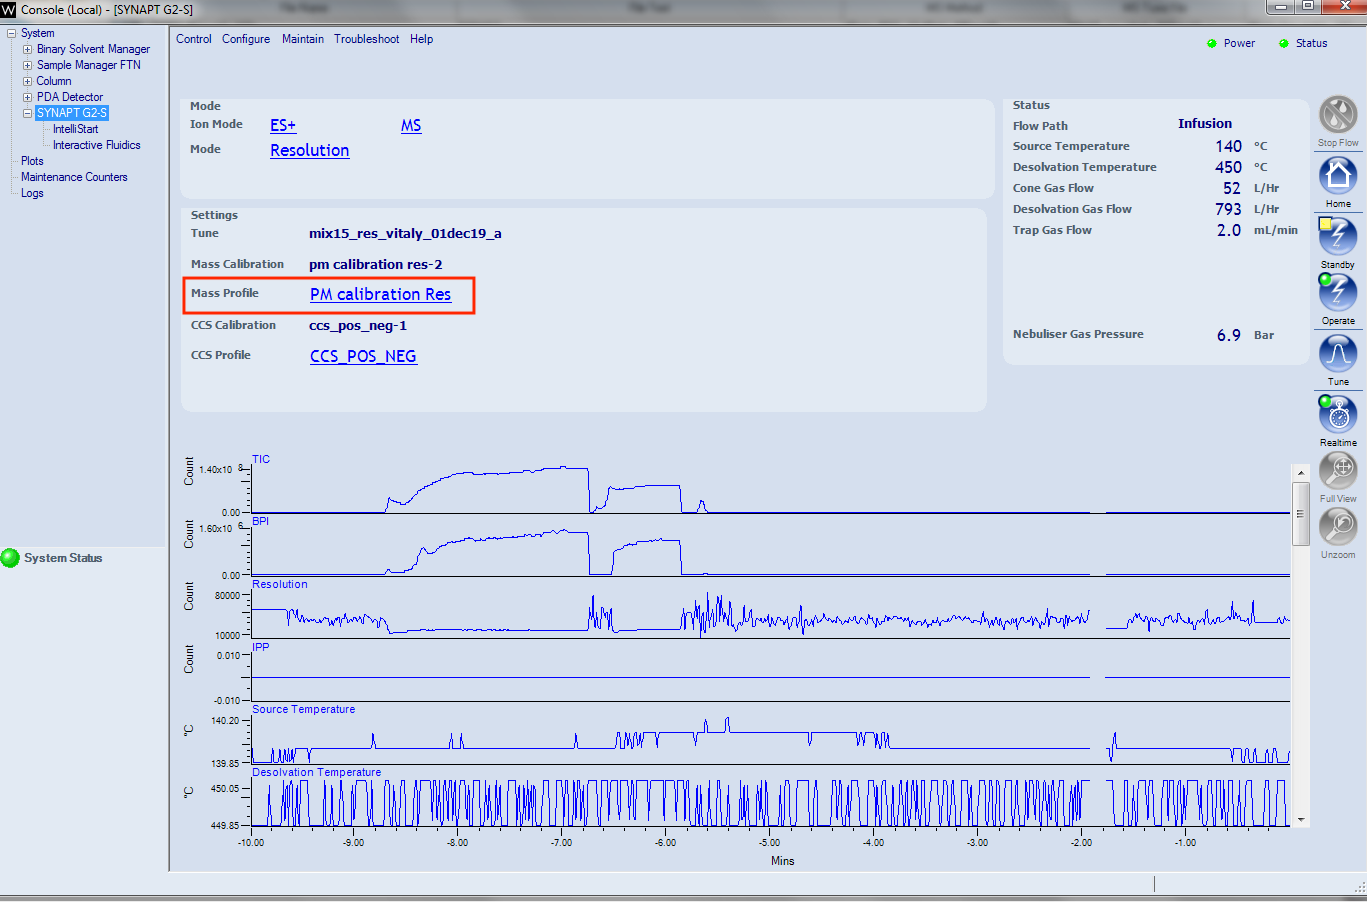
Figure 4.19: Check if your selected calibration file is attached (For instance, PM calibration Res file was selected, and this file should also show in this page)
- Go to Inteli Start/Mass Calibration Profile Editor, select the calibration file that you want to calibrate,then click Edit Tab, click reset. By doing this, you want to make you previously calibrated file uncalibrated.
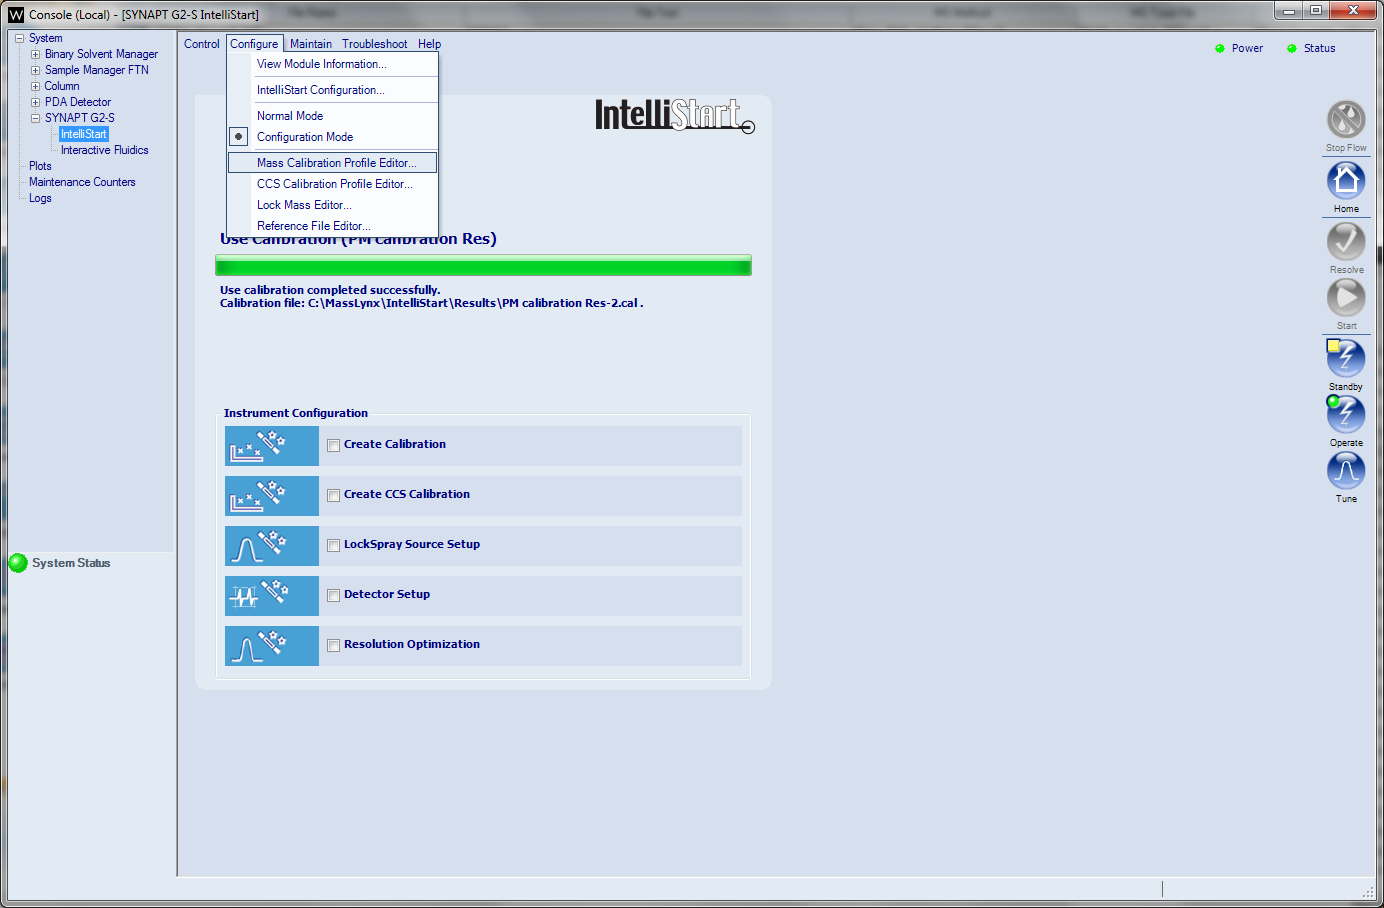
Figure 4.20: Select Mass Calibration Profile Edit
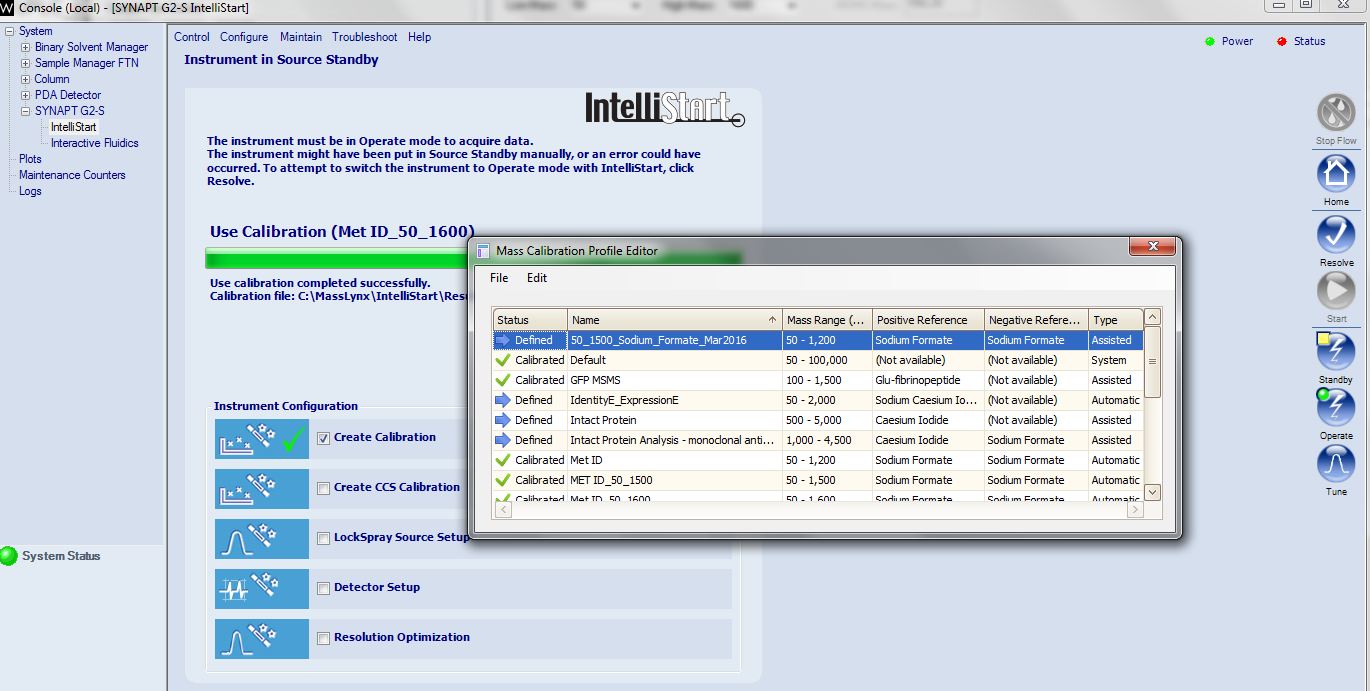
Figure 4.21: Reset the calibration method that you are about to calibration
- Go to Inteli Start/Configuration Mode, select Create Calibration. Here we only need to calibrate resolution mode.
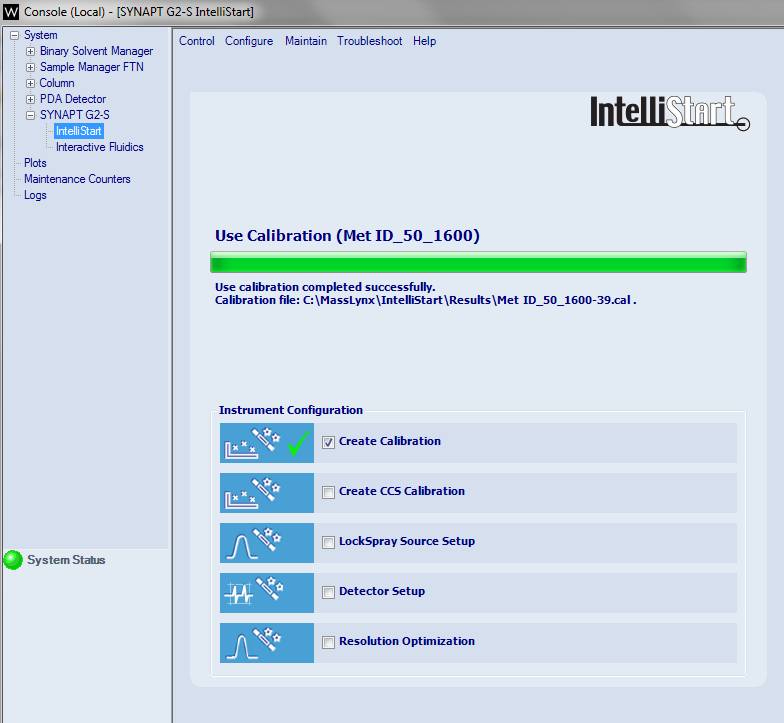
Figure 4.22: Creat Calibration
Sometimes you will emconter a situation that the syringe is empty but the calibration is still not finished. In fact enough data have been collected, but due to the memory problem (RAM) of the PC, the sottware cannot process the data.
For this case, we have to restart the PC.- After calibration, change back the Sampling Cone to the original one, and set back the Fluidics page.
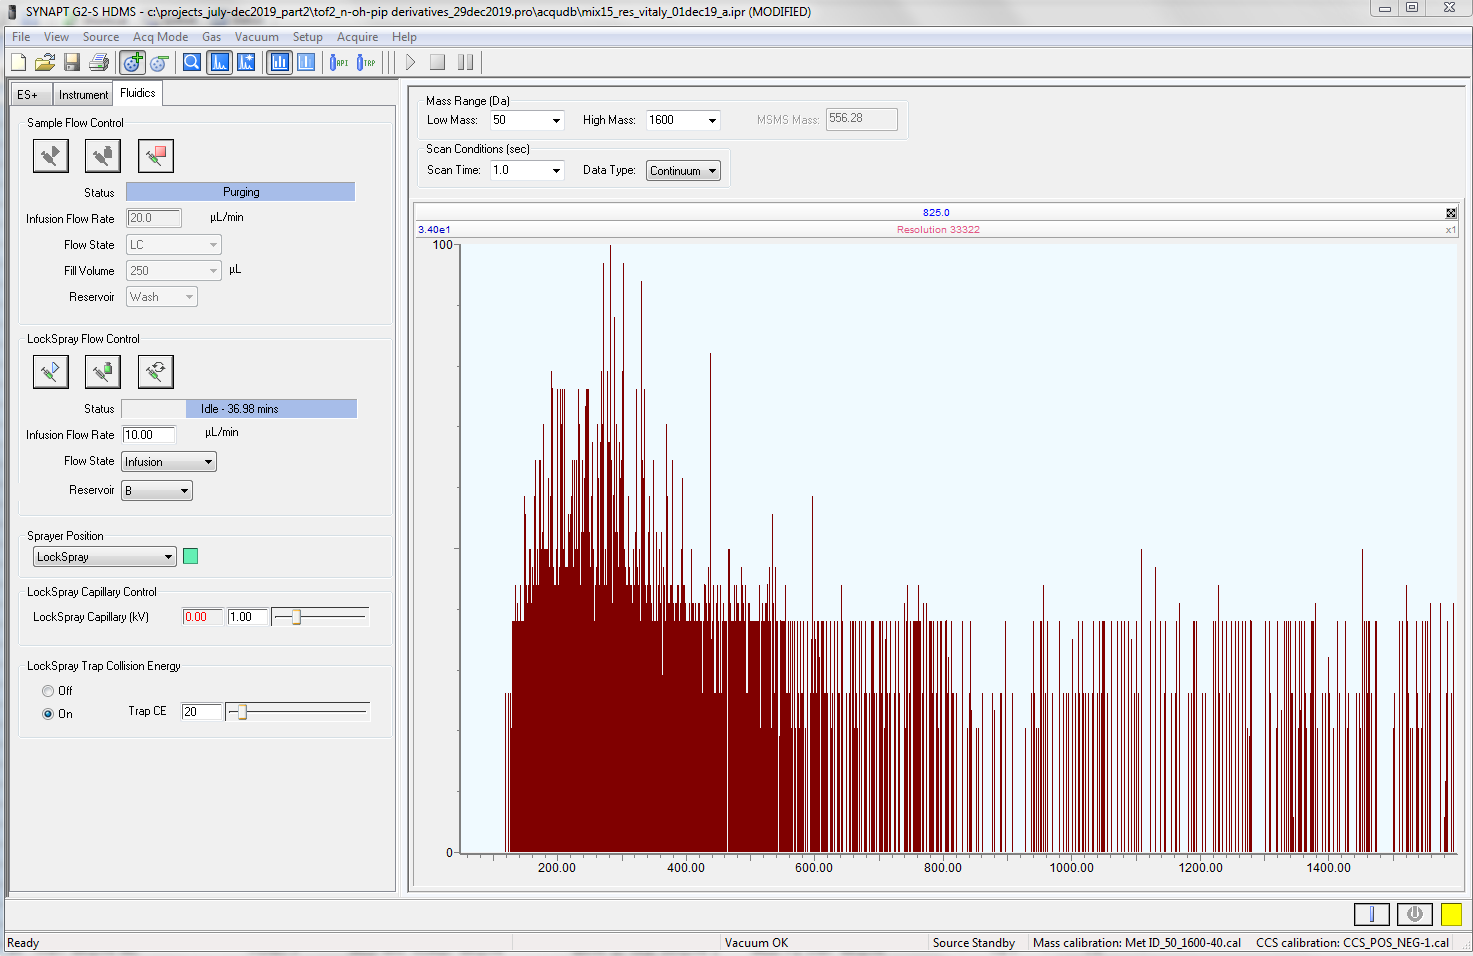
Figure 4.23: Change back the paramers to your original tune parameters.