Chapter 1 Bruker SolariX XR
1.1 Introduction
Our instrument, the Bruker SolariX XR, is a hybrid mass spectrometer combining a 7 Tesla FT-ICR with a front-end quadrupole. The instrument offers ultra-high resolution (up to 10,000,000 resolving power at m/z 400) and sub-ppm mass accuracy, both of which are essential for the analysis of complex mixtures and high molecular weight species.
1.2 Practical user manual
The practical user manual here refers to the guides or tutorials which do not appear in the official user manual.
1.2.1 Sensitivity test for MALDI
Material: sensitivity plate (official name: Prepared MTP Sensitivity Target AC). Glu-1-Fibrinopeptide B (Glu-Fib) Peptide standards (250 amol) together with the MALDI matrix have been pre-deposited on the well of target. It can be directly used for the test (Figure 1.1).
Solarix instrument parameters for sensitivity test: Laser focus: ultra-Large; Laser Shots: 500; Frequency: 1 kHz; Scans: 1.
To pass the test, the S/N ratio should be over than 25 (Figure 1.2).
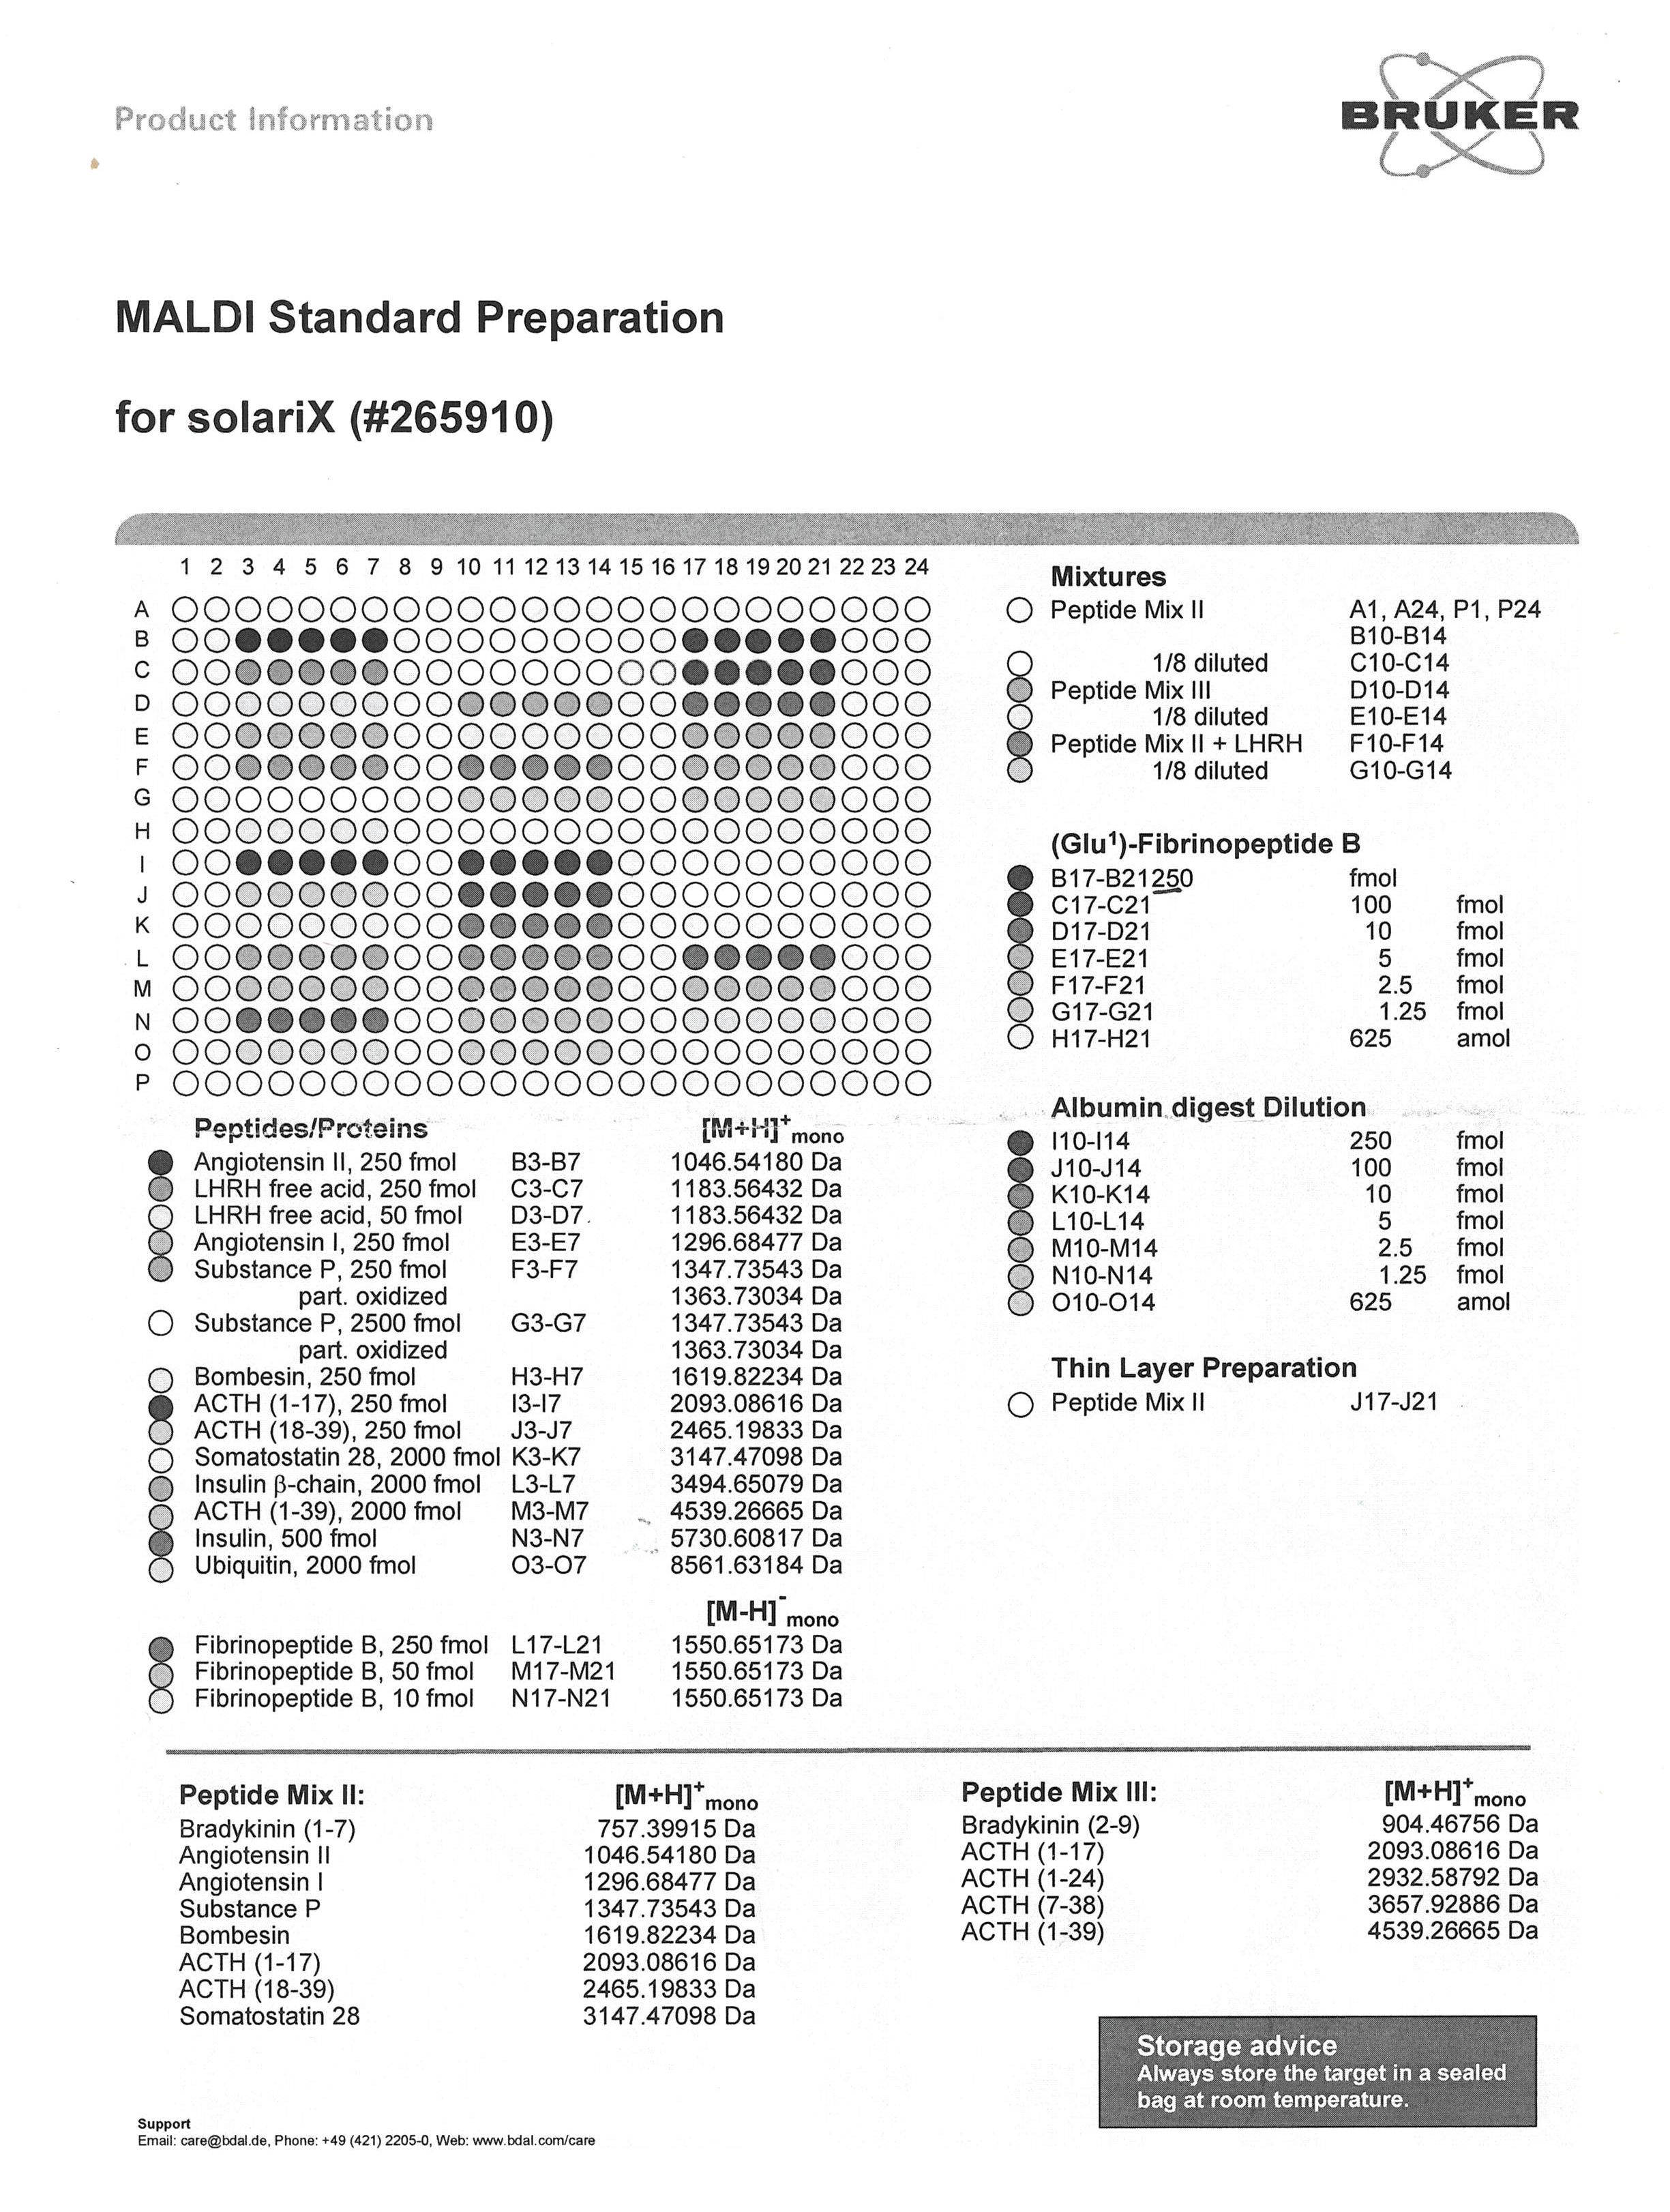
Figure 1.1: Glu-Fib standard locations and concentrations on the sensitivity plate
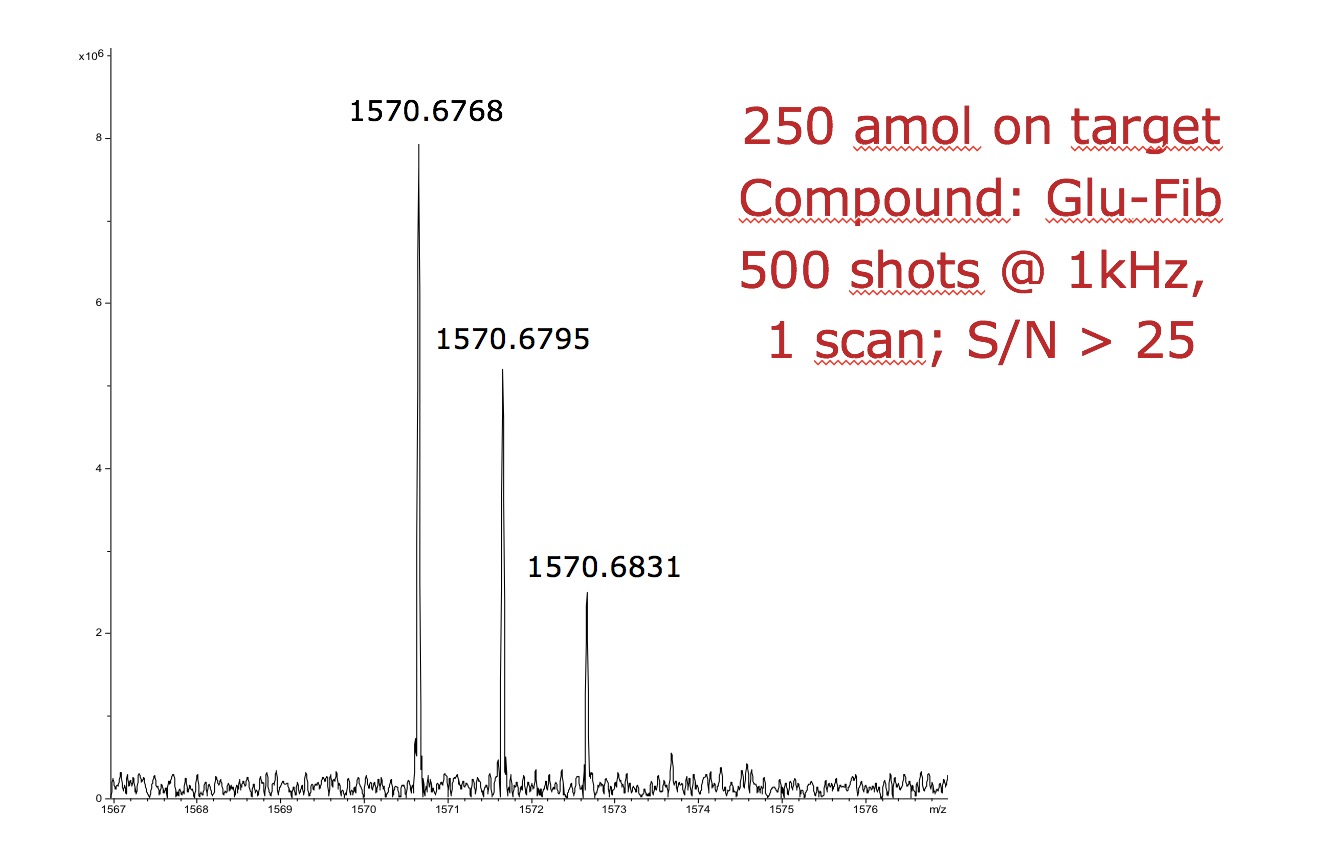
Figure 1.2: MALDI sensitivity test result from Bruker User Manual
1.2.2 Sensitivity test for ESI
Material: NaTFA
Compare with the reference results
1.2.3 Check the isolation and fragmentation
Use LHRH, ESI mode
Adjust the DC Extract bias, to allow the optimum ion intensity of LHRH
Parameters: Q1 Mass: 592.3; Isolation window: 5.0
Isolation efficiency > 60% is acceptable. To calculate it, use the ion intensity of LHRH with isolation divided by the ion intensity without isolation
For fragmentation, we can see their fragments (you can find the reference list of all its fragments in ESI calibration list). Then add all the absolute ion intensities of the fragments and divided by the ion intensity of 592 (LHRH). The acceptance should be > 70%
1.2.4 Check mass resolution (elemental composition)
Use lincomycin
This is performed under isolation mode. Parameter: Q1 mass: 407.2; Isolation window: 5
Start from 1 M, we can see 3 peaks with 1 M, but we need 5 peaks
Set sweep excitation power: 12%. Lower is good for high MS resolution
Always adjust the peak shape (by changing the front and back trap plate; side Kick could also be used to improve peak shape and mass resolution), 409 and 407, before move to higher size, such as from 1M to 2M. We should do it at each size. Do not jump from 1M to 4M. Only if when the real Resolution is higher than the estimated resolution, then we can go the next size
Use 4M, adjust peak shape. Continue to reduce the sweep excitation power to 7%
Increase the lower m/z (this will also help to increase MS resolution for 409). But the lower m/z should be not higher than 409, otherwise, we will not see the 409 peak
The mass resolution for 409.2 should be > 1000,000
1.2.5 Bakeout: for vacuum maintenance
Bakeout parameters:
Bakeout time: 12h
No. of Bakeout: 3h
Interval time: 7h
Keep ECD off during bakeout
1.2.6 Some parameters
Sweep excitation power: 18% (default)
It is important for mass accuracy and mass resolution
Increase it (i.e., + 5%) will be good for mass accuracy
Front trap plate and back trap plate
They are important for ion intensity and peak shape
Their values should always be the same, and the normal working range is 1.3 - 1.7 V (pos), -1.3 - -1.7 V (neg)
Capillary Exit and Deflector Plate
They are important for ion intensity
For Capillary plate, the value is till 220 V, and should not be lower than that of Deflector plate
For Deflector plate, the value is between 180-200 V
Time of Flight
Important for ion intensity (sensitivity) for different mass range
Higher time of flight: good for higher mass
Lower time of flight: good for smaller mass
DC Extract Bias
It is very important for ion intensity. There is an optimum value, we need to adjust it
It is also important for isolation and fragmentation. Adjust this parameter to allow the precursor ion have the highest ion intensity
Com air
- It is connect to N2 in our lab. The pressure should between 5-6 bar, if too low, the beam valve will be permanently closed
1.3 Trouble shooting
1: Sometimes I cannot restart the source pumping systems after switching off Solarix

Figure 1.3: I cannot start the source pumping system
Solution:
- Open the side cover and check the right bottom part. If CB5 is off, turn it on.
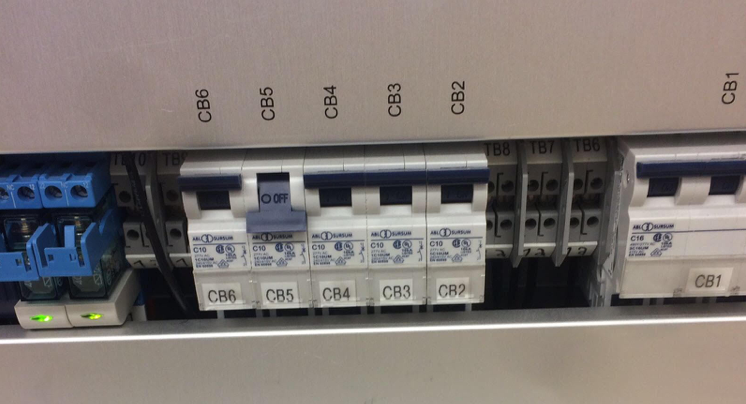
Figure 1.4: CB5 is off
- Open the FTMS vacuum control panel. Press the start of the source vacuum pumping.
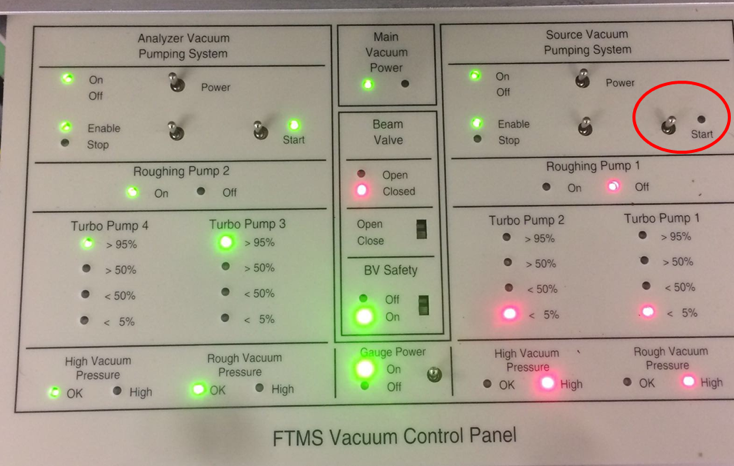
Figure 1.5: switch on the start of the source vacuum pumping
Go to FTMScontrol software and start the source pumping system as in Figure 1.3, check if it works now.
Reset NICE.
2. Imaging analysis stops half way during acquisition; and/or laser is not shooting: an error shows up each time

Figure 1.6: Acquision error from CPR/goFTMS
Close FTMScontrol, switch off the console, wait 10 sec, and switch on the console (wait for post code “98”).
Click fixit2 2 times, and restart the software.